Facebook Boost Ad Results
For today’s Traffic Tactics Thursday, I want to share my most recently experience with using Facebook boost ad for the first time.
Originally I was told that this was a bad idea and a waste of money. So I decided not to use it because of my initial exposure to it and why it doesn’t work.
But then I was introduced to a marketer who found a way to get a lot of mileage from a boosted post on Facebook if done right. He quickly went through his method in which I could copy (without buying his program)
He demonstrated where most people go wrong when selecting the boost button. You have a choice when it comes to your audience. This is where most people boost post to show to an non-targeted audience, so result will be poor.
Once I felt that I got the hang of what he was saying, I decided to try it with one of my Facebook fanpage posts as a learning experience. Initially, I had set it for $20, but then discovered I could set it for less. So I reset the ad for ten bucks.
Facebook boost ad settings
Most people use the general audience selection and this is where they make their biggest mistake. Instead, it is best to target your audience and can setup basic parameters.
This includes what countries you want included, age ranges, gender selection, and interests (where to put your targeted keywords which you can add up to 10 – but I don’t recommend using that many). And then name it for future reference (this is where you can develop different audience profiles, and then use the one most appropriate once you test them).
Once your audience is set, you decide on your spending budget for the post. Even though it has presets ($20, $60, $200, $1,000, $1,500) or choose your own. You want to choose your own. My recommendation is start out with either $5 or $10. This also gives you an idea of the amount of people that POTENTIALLY will be reached.
The next setting is for how long you want to run the boosted post. This is where I made my first mistake – I set it for only a day (not enough time). I recommend running it for at least 3 days (I ended up changing it from 1 day to a week)
Finally, is the payment section that you will need to fill out initially. Once done, they keep it on record for future ad buys.
Submitting Ad for approval
Once you have completed the setting section, then click boost and your ad is automatically submitted to Facebook for review. Ad approval normally takes about 15 minutes, but my ad wasn’t approved even close to it.
After waiting 48 hours, I discovered where I made my ad run time setting mistake. After I went back to manage ad section, I changed the time period to run longer, and within minutes my boost ad was approved and started running.
My fanpage boost ad was for an actual blog post I had done and included my post graphic. This is where I made my next mistake – like I said, this is a learning experience process.
The post looked great when looking at it from a desktop or laptop, but sucked when viewed on a mobile device! Why? Because that’s when I discovered I wasn’t using the optimal graphic dimension.
From now on when adding my blog graphics to my article post, I will at least have one of my graphics that has the ideal size for a Facebook post. I discovered that the ideal size is 470 x 246 pixels. The graphics looks great on all devices with this size.
Precautions to be aware of
I also discovered that the graphics you use in a post cannot have the text portion within the graphics more than 20% of the total graphics area. If it is, then it will definitely be scrutinized and runs a big risk of being rejected (depending on the content and how much text occupies it).
The Facebook ad department also called my with a follow up and stated their dislike of affiliate ad promotions (not permitted). I assured them that it was to a product review on my website (which they could verify anyway).
And finally, if you site that you are promoting the boosted ad post doesn’t have a privacy policy page and terms (or terms of service) page, you won’t get approved or could get your ad pulled.
My Facebook boosted post results
In general, I didn’t achieve with the boosted ad post what I had hoped to do. But I did achieve a “hands-on” education by doing it – knowing what not to do and what to do better.
Overall results
My overall results are shown below. The ten dollars I spent helped boost my post to be viewed by 570 (targeted) people. You can see the age range response as well as to the genders and devices used to view it.
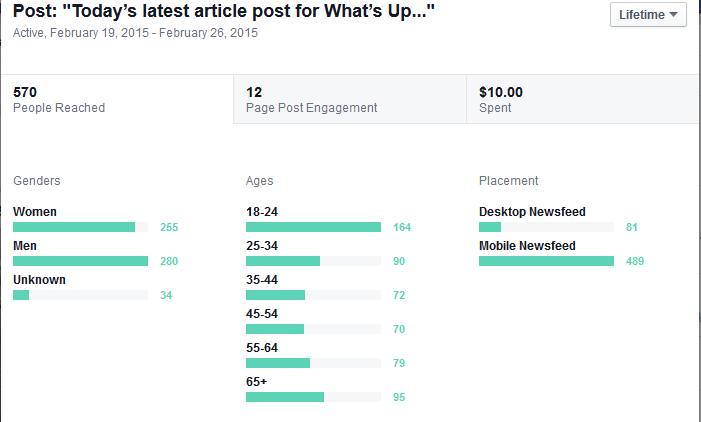
What’s noteworthy to me (besides the 12 page post engagements) is the amount of mobile vs desktop viewers which was 86% mobile. The graphics I used was practically unviewable on mobile and that was where the majority of the viewer came from (and a reason why it wasn’t engaged as well).
Location
Another mistake I made was selecting too many countries to start with (graphics below show 10, even though I selected only 5). I thought the majority of my traffic would be generated from the US. But I was surprised to see that most visitors were from the UK (London had the most).

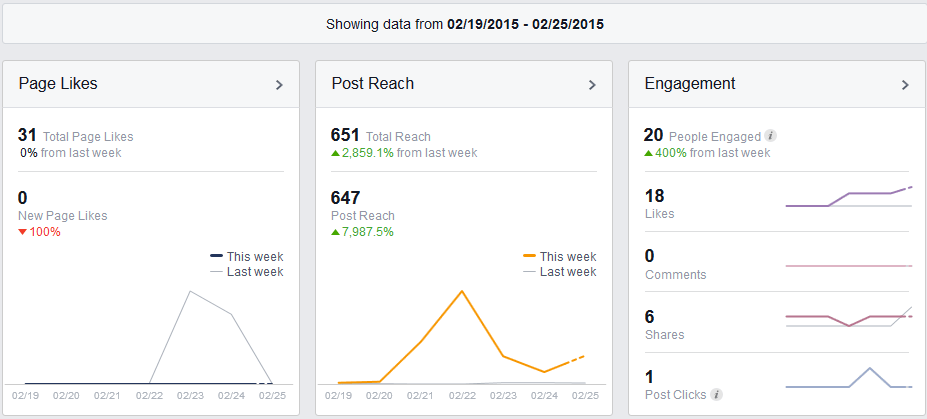
The next graphics below shows the results of fanpage likes, the total post reach (both boosted and organic), and the total post engagement including only ONE actual click to see the post on the fanpage, damn! This is where I experienced my biggest disappointment!
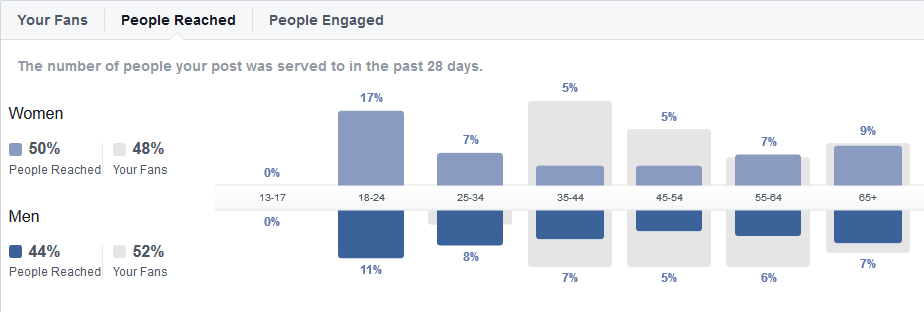
Continuing on, the next graphics below shows a further profile breakdown of the people reached by age and gender. Also the percentage of those from each group that are already your fans (because an organic reach is poor, only 4 out of 31 fans saw the post).
The graphics data below tells me what days I had the best engagements along with the overall data which was cost per reach. As I said in the beginning, I wanted to achieve close to what the person who had convinced me to do this had achieved – that was around five cents. As you can see, that didn’t happen. Instead my cost was 83 cents per person who engaged with the ad. I can do better.

Final Thoughts…
I had mixed emotions with the results. My initial desire was to get more bang for my advertising dollar – but I didn’t. I wanted to squeeze as much as I could from the boosted post.
If things had gone as I had envisioned, the boosted post should have brought more people to my fan page. I had hoped to increase page likes and generate more traffic to my website – besides liking a post.
On the other hand, I discovered the mistakes I made with this first boost ad and have made adjustments. Those adjustments include:
- using the right graphic size
- knowing more about my target audience from the results
- better defining the market reach
- targeted keywords used before I boost another post.
If you have had a chance to do so, please visit The Smart Affiliate fanpage >here< and like my page. Otherwise, please leave any question, observation, input, or comment you would like to make below – thank you! 🙂
